A guide for hardware engineers on conducting tests in Linux mode on the ADP3450.
As a purely hardware engineer who primarily focuses on schematics, PCB layout, and the inevitable hardware test and debug, Python scripts and Linux scare the life out of me. At the same time, as I work primarily remotely and sometimes my hardware testing needs hours of idle tests before I can really do anything meaningful with them, I found myself searching for a solution to give me more freedom.
Behold: The ADP3450’s Linux Mode! Something which I initially was terrified of, but now cannot live without. Grabbing my laptop to go on site for a client commissioning while leaving my hardware tests running a long test script back in my home office? CHECK! ✅
I can’t imagine life before having this option anymore. And I am SO excited to share with you how I learned this in the next section. I’ll break it down in a way that’s understandable for other hardware engineers and explain the bits I personally struggled with, which were often overlooked in other tutorials because they assumed a certain level of firmware experience.
Prerequisites
An ADP3450! This isn’t possible on other ADP models.
Waveforms (you need to make a free account to download)
A USB stick to transfer files to the ADP3450 (later we’ll look at sending it over the network instead!)
VSCode (or your favourite code editor)
Python installed on your laptop for testing. Our ADP had Python 3.7.3 installed in its Linux Mode install.
If you’re on Windows:
PuTTY for connecting to the serial terminal on the ADP3450. You can get the latest MSI package. If you’re in doubt which one you need, it’s probably 64-bit x86!
Getting into Linux Mode
First things first, we’ll need to boot our ADP3450 into Linux Mode so that we can perform our tests on it when we’re away from our ADP3450!
Connect your ADP3450 to your laptop via USB, connecting to the port labelled “Device”.
Open Waveforms
In Settings > Device Manager, select your connected ADP3450 and click Boot from the toolbar.
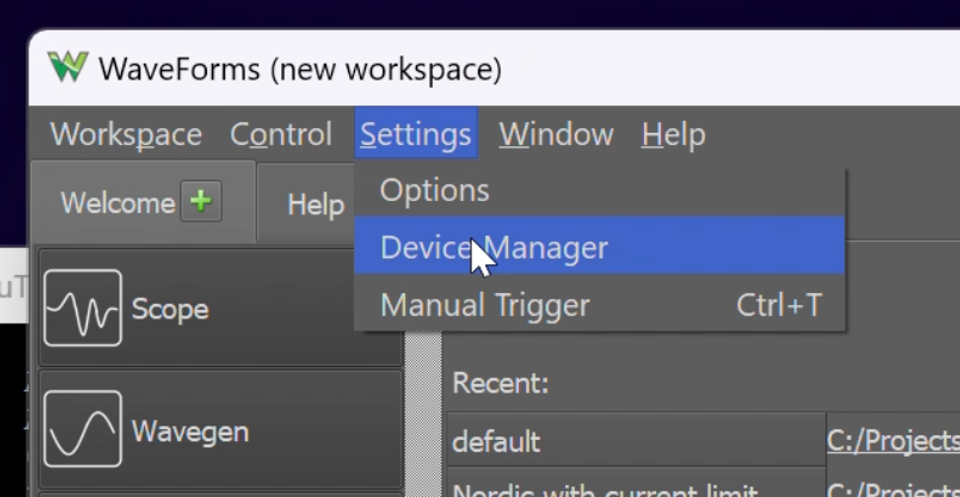

Select “Linux” and Apply & Reboot.

• If you’re a Windows user:
Open “Device Manager” (pro-tip: you can get to this quickly by right clicking the Start button!)
Under the section “Ports (COM & LPT)”, find your ADP3450. If you’ve only got one device connected, you’ll probably one see one item listed here! It should appear as “USB Serial Port (COM5)” – Your number after COM may be different!
Open PuTTY. It will open to the “Session” view in the sidebar.
Under “Host name (or IP address)”, type the COM port we just found. We would type “COM5” in our case!
In the speed box, type 115200. This is the ‘baud rate’ of the ADP3450, the speed at which the device sends and receives messages over the serial port.

• If you’re a macOS or Linux user:
Open a terminal
Run
ls /dev/tty.*, this will show you a list of connected device terminals. You should see something like/dev/tty.usbserial-XXXXXXXXshow up in the output.Run
screen /dev/tty.usbserial-XXXXXXXX 115200. This will connect you to the ADP serial terminal on the specified baud rate of 115200.
Once the device boots, you should see the prompt
ADPro login:, if you don’t hit enter a couple of times and it should show up.Login with the username
digilentand the passworddigilent(your password won’t be printed to the screen).
Writing our code to run on the ADP3450
Importing our libraries
The first thing we need to do is set up our code with all the right imports and libraries so we can interact with the ADP3450. The dwf library (which stands for Digilent Waveforms) comes bundled with the WaveForms SDK, but is located in a slightly different place on disk depending on your operating system.
This block of code figures out which operating system you’re on and then loads the library into python from the right location.
1. # -----------------------
2. # Import all of the required libraries
3.
4. import ctypes # import the C compatible data types
5. from sys import platform, path # this is needed to check the OS type and get the PATH
6. from time import sleep
7. from datetime import datetime
8.
9. # load the dynamic library, get constants path (the path is OS specific)
10. if platform.startswith("win"):
11. # on Windows
12. dwf = ctypes.cdll.dwf
13. constants_path = "C:\Program Files (x86)\Digilent\WaveFormsSDK\samples\py"
14. elif platform.startswith("darwin"):
15. # on macOS
16. lib_path = "/Library/Frameworks/dwf.framework/dwf"
17. dwf = ctypes.cdll.LoadLibrary(lib_path)
18. constants_path = "/Applications/WaveForms.app/Contents/Resources/SDK/samples/py"
19. else:
20. # on Linux
21. dwf = ctypes.cdll.LoadLibrary("libdwf.so")
22. constants_path = "/usr/share/digilent/waveforms/samples/py"
23.
24. # import constants
25. path.append(constants_path)
26. import dwfconstants as constants
Connecting to the ADP with Python
Before we run the code, we need to close the Waveforms GUI app (the graphical app we just used to boot into Linux mode). This is because the ADP3450 can only be connected to from one place at a time and it is currently connected to from the GUI app. If we try to connect from our python script, we will likely get an error saying the device is busy and can’t connect.
We’re now going to start using the Waveforms SDK. Digilent provides documentation for each function we’ve used here, so you can Ctrl+F/Cmd+F on their documentation page to search for the functions we’re calling (like
FDwfDeviceConfigOpen) to understand in more detail the arguments that we’re passing to each function.First up, we need to connect to the device! As there’s only one device plugged in, this should be the first available device we find!
Once we’re connected to the device, we will get a ‘handle’ returned to us that we need to use in our future blocks of code so we can correctly address the device we want to talk to! This is sort of like the ADP returning us a postal address so we know where to send our letters (or in our case, code instructions!) in future!
1. # -------------------------
2. # Connect to the device
3.
4. def open_adp():
5.     """
6.    Open the first available device
7.    """
8.     # this is the device handle - it will be used by all functions to "address" the connected device. Here we're just making an empty C int that we can store our handle in when we get one!
9.    hdwf = ctypes.c_int()
10.    # connect to the first available device
11.		# We pass the empty c int as the last argument so the dwf library can fill it with the handle value once we're connected
12.    print("Opening first device")
13.    dwf.FDwfDeviceConfigOpen(ctypes.c_int(-1), ctypes.c_int(0), ctypes.byref(hdwf))
14.
15.    if hdwf.value == 0:
16.				# If we don't get a value, something has gone wrong, so we will create a string buffer that we can store our error message in. That way we can print it out to the screen to understand better what has gone wrong!
17.       print("failed to open device")
18.        szerr = ctypes.create_string_buffer(512)
19.        dwf.FDwfGetLastErrorMsg(szerr)
20.        print(str(szerr.value))
21.        quit()
22.
23.    print(f"Device ({hdwf.value}) successfully opened!")
24.
25.    # Return the handle to be used in future function calls
26.    return hdwf
We also need to make a function to close the device, otherwise we might run into problems trying to reconnect to the device in future! It will probably throw us a “Device busy” error if we don’t close the device properly before trying to connect!
1. # -----------------
2. # Close the device when we're done so it's available to other programs/scripts
3.
4. def close(hdwf):
5.    print("Closing device")
6.    dwf.FDwfDeviceClose(hdwf)
7.    return
Writing the tests you want
We are going to write functions so we can run the tests we want!
Here’s an example for measuring voltage. When we run this function in a bit, we’ll call it using our device handle and the channel number that we want to record.
1. # -----------------
2. # Measure a voltage
3. def measure_voltage(handle, channel):
4. """
5. measure a voltage
6. parameters: - device data
7. - the selected oscilloscope channel (1-2, or 1-4)
8.
9. returns: - the measured voltage in Volts
10. """
11. # set up the instrument
12. dwf.FDwfAnalogInConfigure(handle, ctypes.c_bool(False), ctypes.c_bool(False))
13.
14. # read data to an internal buffer
15. dwf.FDwfAnalogInStatus(handle, ctypes.c_bool(False), ctypes.c_int(0))
16.
17. # Create an empty variable to store the measured voltage, like what we did with the handle earlier
18. voltage = ctypes.c_double()
19. # extract data from that buffer and save it in the voltage variable.
20. # The channels are 0 indexed in the library (0-1 or 0-3), but 1 indexed on the device itself (1-2 or 1-4), so we need to subtract 1 from the channel number we've provided to the function.
21. dwf.FDwfAnalogInStatusSample(handle, ctypes.c_int(channel - 1), ctypes.byref(voltage))
22.
23. # store the result as float - a number with a decimal point!
24. voltage = voltage.value
25. return voltage
The dwf commands that end in
Configurehandle setting up the device for a specific action. With these arguments, we are setting up the device with the handle we’ve given to our function at runtime, but we’re not resetting the Auto trigger timeout or starting the capture just yet. This is what the twoFalsearguments are doing!The
FDwfAnalogInStatuscommand reads data from the device and stores it in a buffer.All of the other
FDwfAnalogInStatus*commands (like theFDwfAnalogInStatusSamplethat we use in a second) don’t communicate with the device and are instead used to handle and return the data from the previousFDwfAnalogInStatuscall.Speaking of which!
FDwfAnalogInStatusSamplegets us the last ADC sample from the specified channel on the AnalogIn instrument.📊🛠️
Writing more tests
There are more examples of using the instruments over on this page in section 3, so you don’t need to worry about writing all these test functions from scratch! You might have noticed the code in this guide looks slightly different though. Let’s explain the differences so you use those examples without errors!
In the Waveforms SDK documentation in Step 2, they describe a function called
open(). We have renamed thisopen_adp(). Theopen()function is a built-in function in python used for opening files. Because we’re opening files so we can write our experiment results to disk, we can’t redefine this function like they have done in the Waveforms docs, otherwise every time we try to open a file, our program will try to open the ADP instead!The Waveforms docs
open()function also returns a very slightly more complex object. I simplified this a bit so it only returns a handle, and not a name as well. All this means is that everywhere you see the examples pass indata.handle, we would just pass indatainstead. I called mydatavariablehdwfinstead so it was clearer that it was a handle to a digilent waveforms device!In short, if you’ve copied all the code in this guide, where you see
data.handle, change it forhdwfand where you seeopen()swap it foropen_adp()!
Putting it all together!
Now that we’ve got our imports sorted, got our functions for connecting to our device (and importantly, disconnecting as well!) as well as a nice voltage read function, we can now put this all together and call our functions to run our test!
1. # ------------
2. # Put all of the pieces together ready to run in order!
3. def run():
4. 		# First we open a handle to our ADP
5.    hdwf = open_adp()
6.		# Get a timestamp so we can create a unique filename to store our results and not overwrite previous results files.
7.    time_now = datetime.now().strftime("%Y-%m-%d_%H-%M-%S")
8.		# Open a new output file
9.    with open(f'./voltages.{time_now}.txt', 'w+') as outfile:
10.        while True:
11.						# Record the voltage on channel 2 every second, printing it both to the screen and to the output file!
12.            voltage_now = measure_voltage(hdwf, 2)
13.            print(voltage_now)
14.            outfile.write(f"{voltage_now}\n")
15.            sleep(1)
16.		# Once we're done, don't forget to close the device!
17.    close(hdwf)
18.
19.
20. # -------------------------
21. # Run the program when it starts! This is a magic python function that runs our run function when the file is run.
22. if __name__ == '__main__':
23.    run()
The whole script in its entirety!
1. # -----------------------
2. # Import all of the required libraries
3.
4. import ctypes  # import the C compatible data types
5. from sys import platform, path  # this is needed to check the OS type and get the PATH
6. from time import sleep
7. from datetime import datetime
8.
9. # load the dynamic library, get constants path (the path is OS specific)
10. if platform.startswith("win"):
11.    # on Windows
12.    dwf = ctypes.cdll.dwf
13.    constants_path = "C:\\Program Files (x86)\\Digilent\\WaveFormsSDK\\samples\\py"
14. elif platform.startswith("darwin"):
15.    # on macOS
16.    lib_path = "/Library/Frameworks/dwf.framework/dwf"
17.    dwf = ctypes.cdll.LoadLibrary(lib_path)
18.    constants_path = "/Applications/WaveForms.app/Contents/Resources/SDK/samples/py"
19. else:
20.    # on Linux
21.    dwf = ctypes.cdll.LoadLibrary("libdwf.so")
22.    constants_path = "/usr/share/digilent/waveforms/samples/py"
23.
24. # import constants
25. path.append(constants_path)
26. import dwfconstants as constants
27.
28.
29. # -------------------------
30. # Connect to the device
31.
32.
33. def open_adp():
34.    """
35.    Open the first available device
36.    """
37.    # this is the device handle - it will be used by all functions to "address" the connected device
38.    hdwf = ctypes.c_int()
39.    # connect to the first available device
40.    print("Opening first device")
41.    dwf.FDwfDeviceConfigOpen(ctypes.c_int(-1), ctypes.c_int(0), ctypes.byref(hdwf))
42.
43.    if hdwf.value == 0:
44.        print("failed to open device")
45.        szerr = ctypes.create_string_buffer(512)
46.        dwf.FDwfGetLastErrorMsg(szerr)
47.        print(str(szerr.value))
48.        quit()
49.
50.    print(f"Device ({hdwf.value}) successfully opened!")
51.
52.    # Return the handle to be used in future function calls
53.    return hdwf
54.
55.
56. # -----------------
57. # Close the device when we're done so it's available to other programs/scripts
58.
59.
60. def close(hdwf):
61.    print("Closing device")
62.     dwf.FDwfDeviceClose(hdwf)
63.    return
64.
65.
66. # -----------------
67. # Measure a voltage
68. def measure_voltage(handle, channel):
69.    """
70.    measure a voltage
71.    parameters: - device data
72.                - the selected oscilloscope channel (1-2, or 1-4)
73.
74.    returns:    - the measured voltage in Volts
75.    """
76.    # set up the instrument
77.    dwf.FDwfAnalogInConfigure(handle, ctypes.c_bool(False), ctypes.c_bool(False))
78.
79.    # read data to an internal buffer
80.    dwf.FDwfAnalogInStatus(handle, ctypes.c_bool(False), ctypes.c_int(0))
81.
82.    # extract data from that buffer
83.    voltage = ctypes.c_double()  # variable to store the measured voltage
84.    dwf.FDwfAnalogInStatusSample(
85.        handle, ctypes.c_int(channel - 1), ctypes.byref(voltage)
86.     )
87.
88.    # store the result as float
89.    voltage = voltage.value
90.     return voltage
91.
92.
93. # ------------
94. # Put all of the pieces together ready to run in order!
95. def run():
96.    hdwf = open_adp()
97.    # More things in here to test!
98.    time_now = datetime.now().strftime("%Y-%m-%d_%H-%M-%S")
99.    with open(f"./voltages.{time_now}.txt", "w+") as outfile:
100.        while True:
101.           voltage_now = measure_voltage(hdwf, 2)
102.           print(voltage_now)
103.            outfile.write(f"{voltage_now}\n")
104.            sleep(1)
105.    close(hdwf)
106.
107.
108. # -------------------------
109. ws# Run the program when it starts!
110. if __name__ == "__main__":
111.    run()
Testing your code
We can test this runs well by running it on our computer first before moving it to the ADP3450.
This is as simple as running your python script. If you know what you’re doing here and it runs fine, awesome! Let’s move on to running it on the ADP3450!
If you’re a bit new to this, lets walk through getting set up to run your code in VSCode.
Getting set up to run code from VSCode!
First up, you’ll need to make sure you’re opening a folder in VSCode, not just the one python file. It’s best if you create a separate folder for each project. If you haven’t already, make a new folder and save your python script there.
Open the whole folder in VSCode from File > Open Folder…
By the way, my VSCode and terminal will probably look a little different in my screenshots to what you see because I’ve got both my terminal and my VSCode editor set up with a few themes and tweaks that work for me, but all the instructions will work exactly the same for you on the default layouts!
Let’s set up a launch file that tells VSCode what to do when you run your code. Click on the “Run and Debug” tab in the left sidebar.

Then click, “create a launch.json file”
Select the first option that says “Python File – Debug the currently active Python file”

This will create a new folder called .vscode with some default settings. We can leave these as they are and close the new launch.json file.
Go back to your original python file and click the green play button in the Run and Debug sidebar!

You should see your code run in the terminal! In my case, I get an error (but that’s just because I haven’t plugged in my ADP!). With your ADP plugged in, you should see it connect and start printing voltage readings to the screen. It will also write them to a new file in the same folder as your python script.
Running your code on the ADP3450
Pop your python script on a USB stick. Your USB stick must be FAT32 formatted.
Plug your USB stick into your ADP! (In a future tutorial, we’ll look at doing this without a USB stick with remote access)
Go back to your terminal session running on your ADP (you were running this in PuTTY on Windows or in a terminal with the
screencommand on macOS/Linux).On your ADP session, run
sudo fdisk -l(that’s lowercase l for list!)If you are asked for a sudo password, enter
digilentFind the device that looks like your USB stick, here it’s our 30GB FAT32 device:
/dev/sda1

Now we need to mount the USB to Linux on the ADP3450 so we can access the files on it.
sudo mount /dev/sda1 /mntmakes the files available in the/mntdirectory.cd /mntopens the USB stick.Run
lsto see the files!Run
sudo python3 first_test.py(replace first_test.py with the name of your python file!)You’ll see it start to dump voltages to the screen!

Now you can unplug your laptop and walk away, leaving the ADP3450 to run. It is writing the voltage results to a file on the USB stick. When you reconnect to the serial port later on, you’ll start to see the voltages on the screen again and you can stop the test with “Ctrl+C”.
You’re all done! Well done! Now go experiment with other instruments on the ADP3450! (of which there are many!)
To follow along with Shrouk, check out the tutorial on our Youtube channel: https://youtu.be/yCoqerUw7Vo